
1. The Purpose (Mission)
- Unify home media storage and availability --> NAS
- Consolidate NAS, Backup and Home Energy Monitoring in one system
- Build Ultimate Zero-click Automated Ripping Machine
- Replace old Ubuntu Backup Server with new always-on system
- Replace old RaspberryPi-based Energy Monitor with this system
- Automate home backups
2. Components
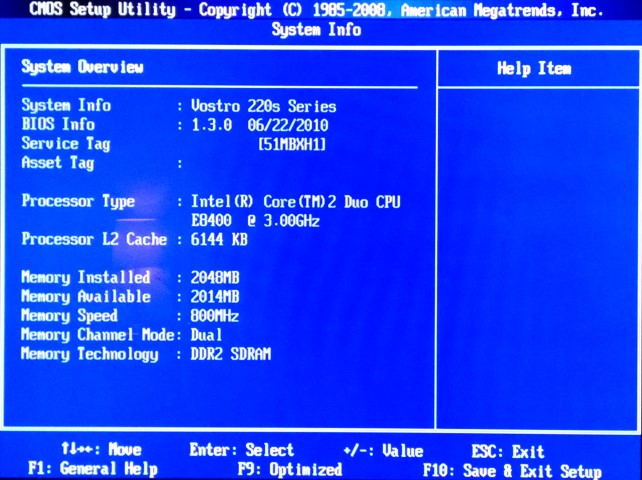
- Old motherboard, used to be part of Dell Vostro 220s
- Fractal Design DEFINE-Mini case
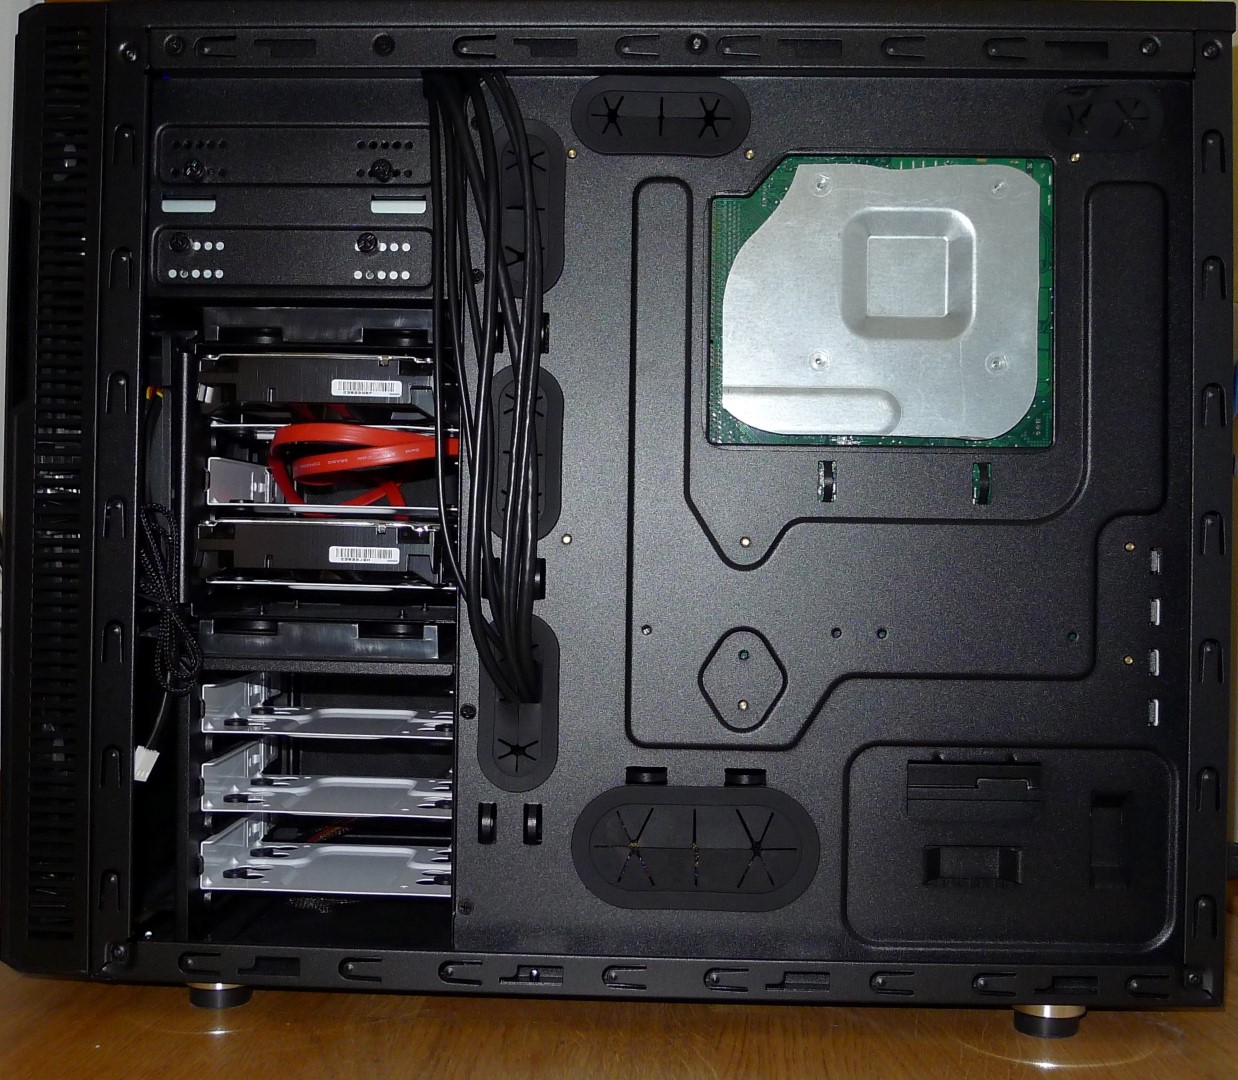
- Two Seagate 4TB NAS hard drives (ST4000VN000) in RAID 1 mirror configuration
- Ubuntu Server as OS
3. Progress Report
3.1. Intro
For a long time I was playing in my mind with the idea of building a NAS, so now I finally decided to dive in. The motivating factor became, actually, my MediaPortal HTPC crapping out. While thinking about how to fix it, I became convinced that I should now put all my movies, music and pictures on a network, once and for all. By the way, speaking of movies, for a long time I was seriously considering building a motorized robotic disk storage system and a catalog plugin for MediaPortal to quickly locate the right disk. At the end, a friend of mine has convinced me that it is much better instead to digitize my disk collection onto a NAS and never bother with optical storage again :)
Naturally, there are many ready made NAS products out there that I could just buy. But who needs an easy way, ha? It is much better to build your own, from scratch! Since we are talking about an always-on system, it now makes sense to put my EmonCMS server on it too. It should also be able to serve my dashboards faster than Raspberry Pi does. Of course, the same system should also be used as general home backup and work together with Duplicati.
The natural choice for OS for me was Ubuntu server edition.
3.2. Hardware
I have learned that NAS hardware actually does not need to be super fast and furious. In fact, there are just two hardware features which seem to be important:
- Gigabit Ethernet
- Multiple SATA ports
I found old Dell motherboard laying around in storage. It used to be part of Vostro 220s slim desktop PC.
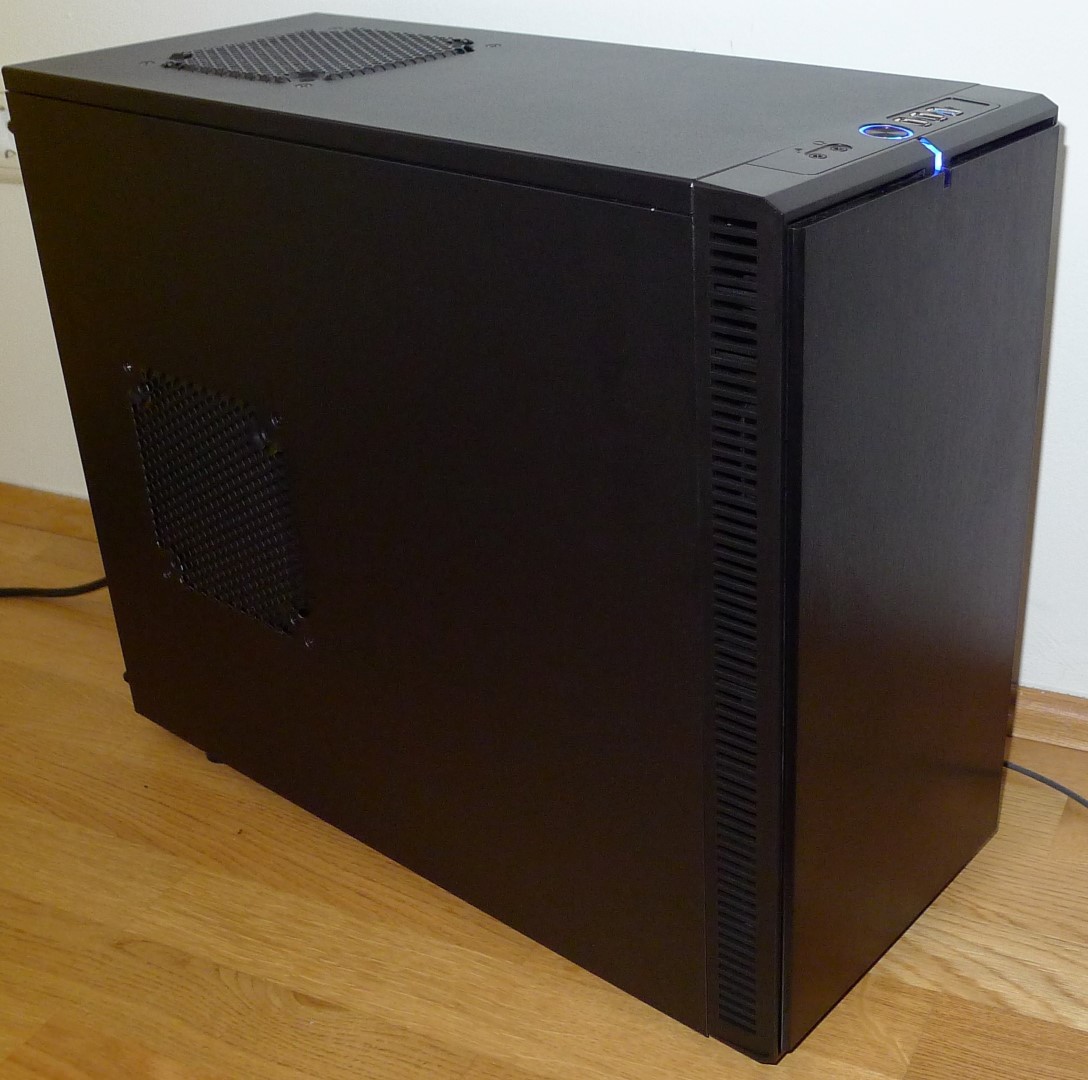
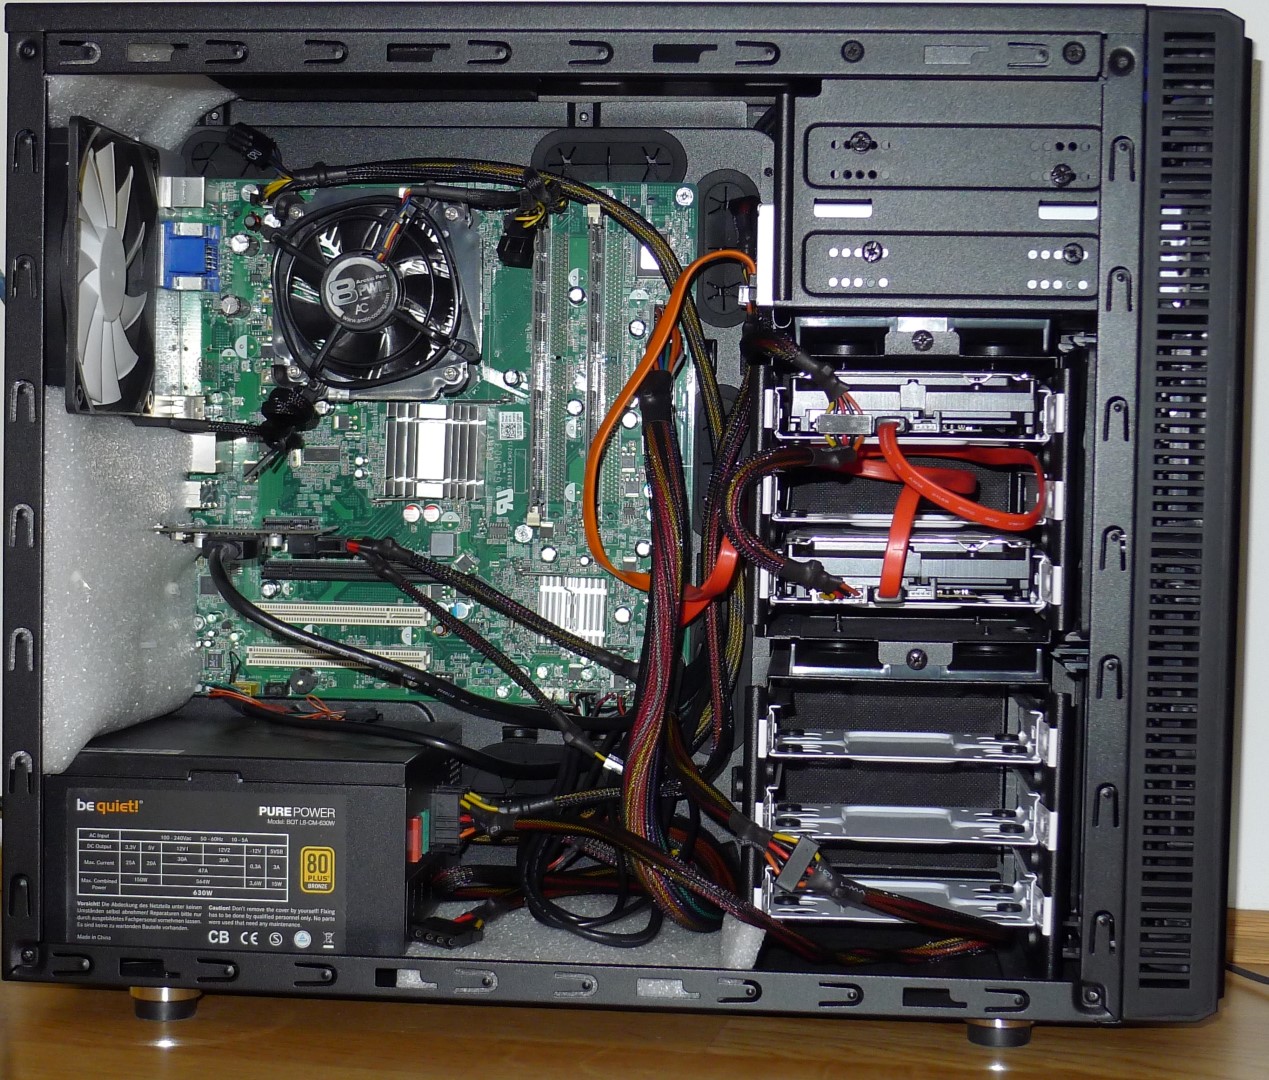
The Vostro case itself was long gone, so I needed to get a new one. Keeping in mind that the system also had to be quiet, spacious and good looking, I ended up getting Fractal Design DEFINE-(not so)Mini case.
 |
 |
 |
 |
3.3. OS Configuration
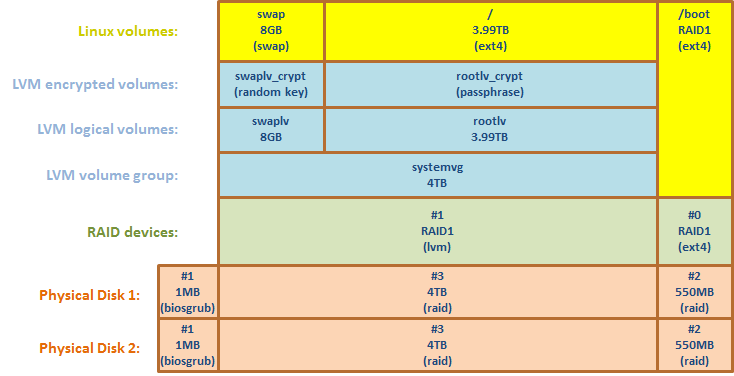
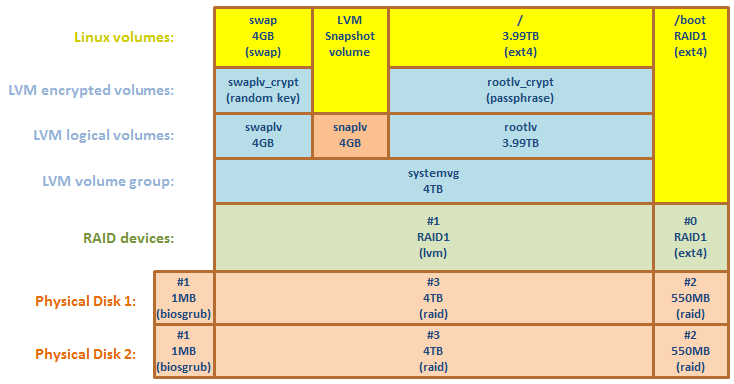
Aside from RAID1 mirroring, I also wanted to have this system flexible and extensible, to be able to add additional disks in the future, as well as encrypting the whole system in case thieves come over. I ended up with the following configuration: encrypted LVM on top of RAID.
Ubuntu server installation disk contains step-by-step wizard to configure all the details. However, it took me a lot of experimentation to get things right.
Here are a couple of nice guides which helped me a lot:
https://help.ubuntu.com/community/FileServerOnLVMOnRAID1
http://www.itfromscratch.com/install-ubuntu-server-12-04-with-encrypted-lvm-on-raid1/
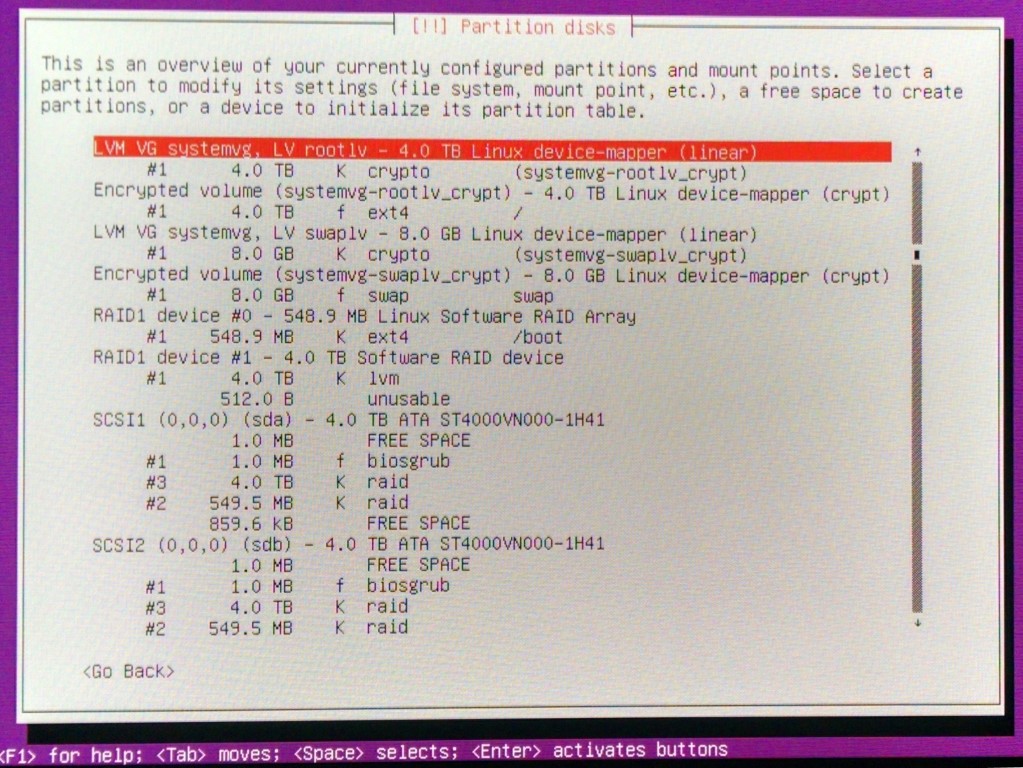
and a few screen shots for my specific setup:
- Create 3 partitions on both disks:
#1 - tiny 1MB in the beginning of disk, type biosgrub
#2 - 550MB at the end of disk, type raid (will be used as boot)
#3 - rest of pace, type raid (will be used as swap + root)
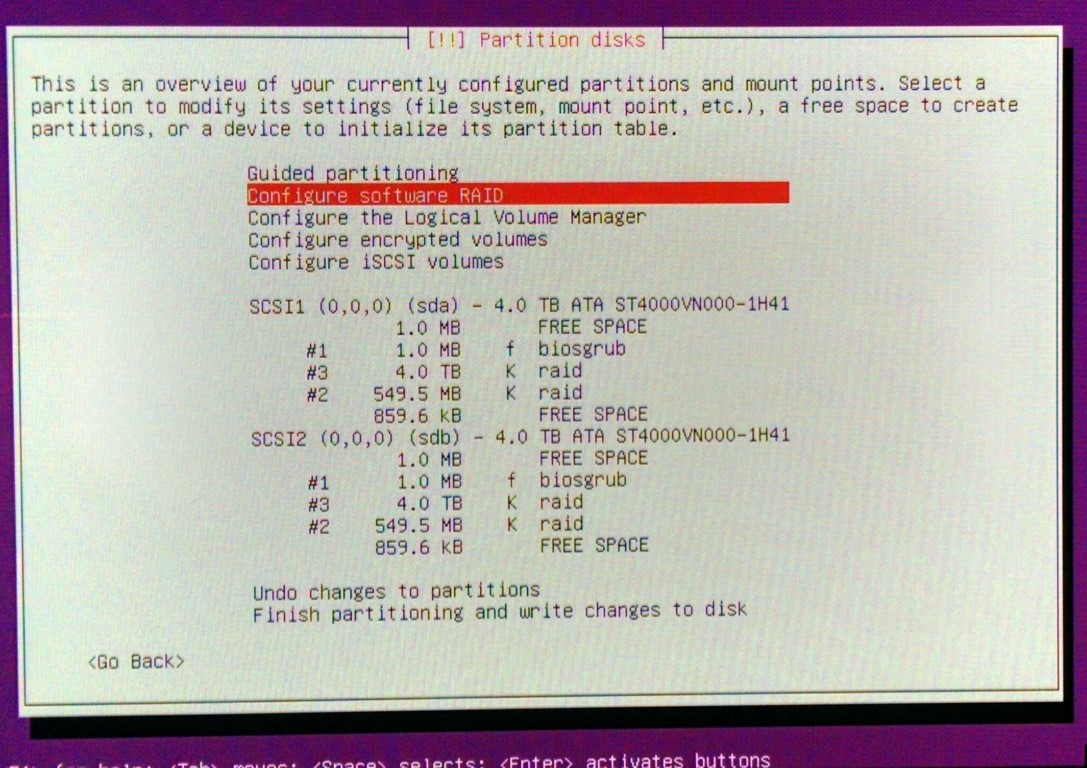
- Configure software RAID:
RAID1 device #0 format as ext4, used as /boot
RAID1 device #1 to be used as LVM
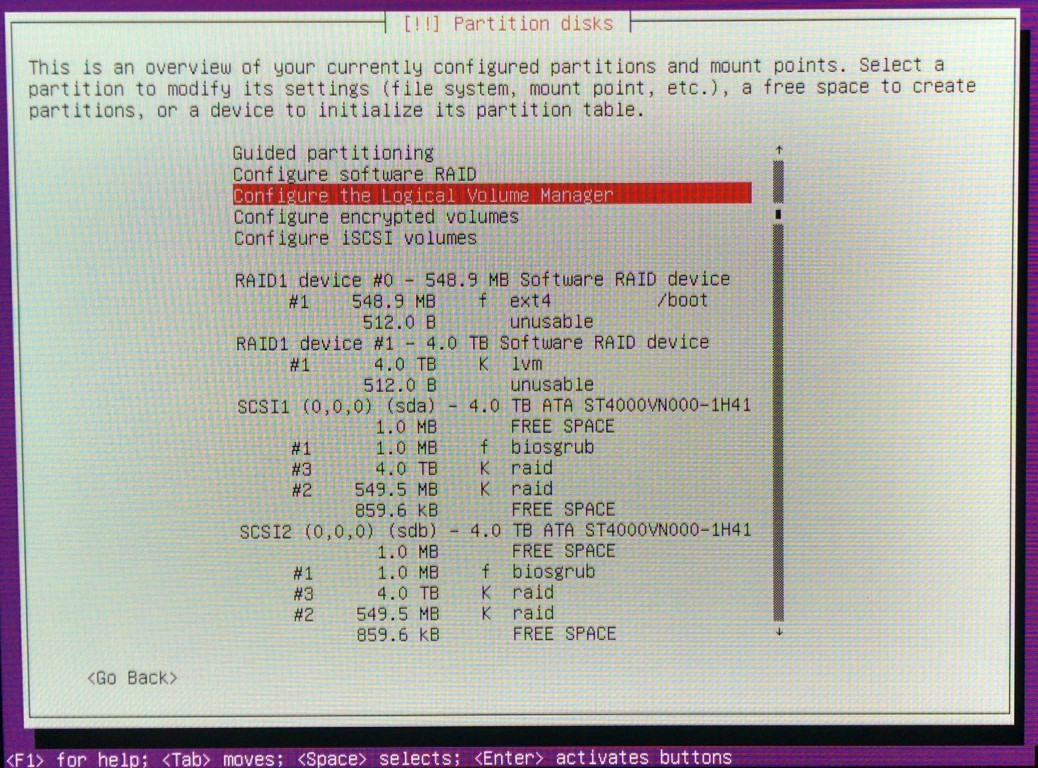
- Create LVM volume group and volumes:
8GB to be used as swap, and the rest almost 4TB as root
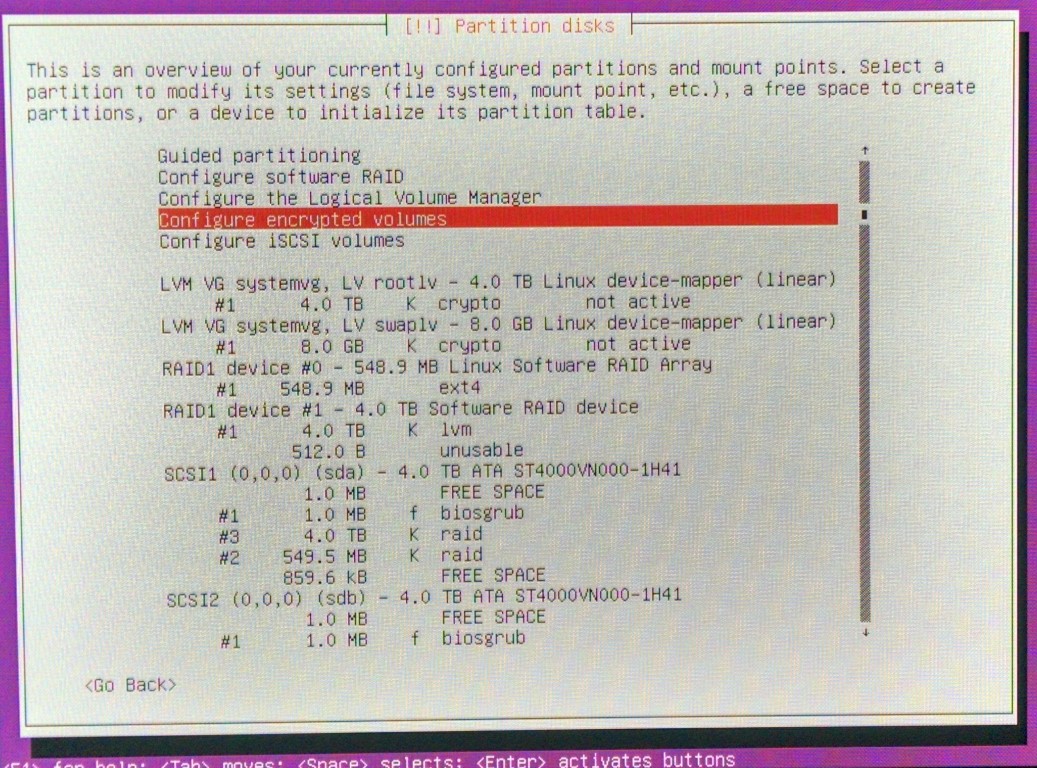
- Configure encrypted volumes:
SWAP to be encrypted wit random key and ROOT with pass-phrase
3.4. RAID
- to monitor array status:
watch -n1 cat /proc/mdstat - to receive emails, in file /etc/mdadm/mdadm.conf set MAILADDR=This email address is being protected from spambots. You need JavaScript enabled to view it.
- to send test email:
sudo mdadm --monitor --scan --test --oneshot - to send test email on startup, in file /etc/default/mdadm set DAEMON_OPTIONS="--syslog --test"
UPDATE: 02.2016
3.5. LVM Snapshot Backup
A recent disaster made think again about the statement I find all over the internet - RAID is not a substitute for backup! Until now, my backup strategy was to take the server offline, attach another 4TB hdd and make a drive clone of one of the raid disks using Clonezilla. Well, one time something went wrong, I pressed a wrong button and removed partition on the source disk, instead of on the destination. I ended up with partly overwritten previous backup and messed up partition table on both working disks! After a week of desperate efforts trying to repair my system, I finally succeeded, by hacking the partition table with hex editor. So, after this big scare I realized that I needed to come up with a stronger backup scheme.
Luckily, LVM library has a nice built-in feature to make a snapshot of a logical volume, which can be later archived. As a benefit, there's no need to put the server offline. The archiving can happen while the system is up and running!
Here's how I did it:
- Create an empty space inside volume group, by reducing size of SWAP:
disable swap:swapoff -a
close and release encrypted volume:cryptsetup luksClose /dev/mapper/systemvg-swaplv
reduce size of swap volume by 3.6GB:lvreduce /dev/systemvg/swaplv -L -3600M
reboot! (see also this link that helped me a lot)
So, a hole is created between swaplv and rootlv volumes, which will be occupied by the temporary snapshot volume during backup.
I have never so far seen the occupied memory size exceeding 2GB RAM limit, Therefore, I think the swap size of 4GB should be more than enough for my needs, so I left it like that permanently.
- Now, every time during backup, I ran the following commands:
create temporary snapshot volume, occupying 100% of free space in my volume group:lvcreate -s -l 100%FREE -n snaplv /dev/systemvg/rootlv
decrypt snapshot volume:cryptsetup luksOpen /dev/systemvg/snaplv systemvg-snaplv_crypt
mount the external storage...
create backup of the snapshot volume:fsarchiver savefs -z7 -j2 -s8000 -c - /mnt/hdd/backup/rootlv.fsa /dev/mapper/systemvg-snaplv_crypt
while the backup is running, the following command is useful to check the status of snapshot:lvs
when backup is finished, close encrypted volume:cryptsetup luksClose /dev/mapper/systemvg-snaplv_crypt
remove the snapshot:lvremove -f /dev/systemvg/snaplv
To automate the backup process, I've created the following script, based on original from System-Rescue-CD site
Bash script download: snapshot_and_archive_root.sh
3.6. EmonCMS
Installed software from scratch, following guide: Install Emoncms v8 on Ubuntu, and imported data from Raspberry Pi
3.7. SSL with client-side certificate
This enables me to install SSL certificate into each device I want to access my dashboards, to enable secure remote access to my Energy Monitor. It was surprisingly difficult to find information about this, but here's a nice guide: Two-way SSL authentication.
Also, in order to get rid of browser warnings due to self-signed server certificate, I created a Certificate Authority (CA) info and imported it to the browser, together with client certificate. This guide helped me a lot: OpenSSL Certificate Authority
The steps are below:
cd /etc/apache2/ssl.camkdir certs crl csr newcerts privatetouch index.txtecho 1000 > serial
create the root key:openssl genrsa -aes256 -out private/ca.key.pem 4096
prepare configuration file: /etc/apache2/ssl.ca/openssl.conf
create the root certificate:openssl req -config openssl.cnf -key private/ca.key.pem -new -x509 -days 7300 -sha256 -extensions v3_ca -out certs/ca.cert.pem
create the intermediate pair:mkdir /etc/apache2/ssl.ca/intermediatecd /etc/apache2/ssl.ca/intermediatemkdir certs crl csr newcerts privatetouch index.txtecho 1000 > serialecho 1000 > /etc/apache2/ssl.ca/intermediate/crlnumber
prepare configuration file: /etc/apache2/ssl.ca/intermediate/openssl.conf
create the intermediate key:cd /etc/apache2/ssl.caopenssl genrsa -aes256 -out intermediate/private/intermediate.key.pem 4096
create the intermediate certificate:openssl req -config intermediate/openssl.cnf -new -sha256 -key intermediate/private/intermediate.key.pem -out intermediate/csr/intermediate.csr.pemopenssl ca -config openssl.cnf -extensions v3_intermediate_ca -days 3650 -notext -md sha256 -in intermediate/csr/intermediate.csr.pem -out intermediate/certs/intermediate.cert.pem
create the certificate chain file:cat intermediate/certs/intermediate.cert.pem certs/ca.cert.pem > intermediate/certs/ca-chain.cert.pem
create server key (without passphrase):openssl genrsa -out intermediate/private/nopwd.server.key.pem 2048
create server certificate:openssl req -config intermediate/openssl.cnf -key intermediate/private/nopwd.server.key.pem -new -sha256 -out intermediate/csr/server.csr.pem
sign server certificate:openssl ca -config intermediate/openssl.cnf -extensions server_cert -days 1000 -notext -md sha256 -in intermediate/csr/server.csr.pem -out intermediate/certs/server.cert.pem
create client key (with password):openssl genrsa -aes256 -out intermediate/private/client.key.pem 2048
create client certificate:openssl req -config intermediate/openssl.cnf -key intermediate/private/client.key.pem -new -sha256 -out intermediate/csr/client.csr.pem
sign client certificate:openssl ca -config intermediate/openssl.cnf -extensions usr_cert -days 1000 -notext -md sha256 -in intermediate/csr/client.csr.pem -out intermediate/certs/client.cert.pem
Import certificates into a browser:
pack client key + cert into p12 file:sudo openssl pkcs12 -export -inkey intermediate/private/client.key.pem -in intermediate/certs/client.cert.pem -out intermediate/certs/client.p12
--> import intermediate.cert.pem into Firefox "Authorities" tab
--> import client.p12 into Firefox "Your Certificates" tab
Prepare keys for PyCurl (for internal server use):
sudo openssl pkcs12 -in intermediate/certs/client.p12 -out intermediate/certs/pycurl.client.pem -clcertssudo openssl rsa -in intermediate/certs/pycurl.client.pem -out intermediate/certs/pycurl.nopwd.client.pem
3.8. SAMBA
https://help.ubuntu.com/14.04/serverguide/samba-fileserver.html
3.9. The Ultimate Zero-click Auto-Ripper
Here's where the fun starts! After everything was up and running, I faced the task of importing my media collection into my new NAS, and I have a lot of disks! So, the goal became to have a script which automatically activates on disk insertion, recognizes the type of disk in tray, does what is needed to rip or copy data to hard drive and at the end eject disk.
The concept and main ideas I found in these places: http://arstechnica.com/civis/viewtopic.php?t=1137975 and http://www.phillomath.com/node/4
3.9.1. Components
Autostart
The only solution that I found that works on headless server installation is based on inotify tools. The incron daemon works just like cron, but for hardware events: http://inotify.aiken.cz/?section=incron&page=doc&lang=en
CD ripper
based on abcde: http://www.andrews-corner.org/abcde.html
DVD ripper
based on dvdbackup: http://dvdbackup.sourceforge.net/
Blu-Ray ripper
not implemented yet, but this guy looks like has what it takes: https://pathar.tl/blog/the-ultimate-automated-ripping-machine/
3.9.2. Step-by-step Setup Guide
CD backup:sudo apt-get install abcdesudo apt-get install lamesudo apt-get install eyeD3
Enable BEEP:
sudo apt-get install beep
sudo pico /etc/modprobe.d/blacklist.conf
--> comment out: blacklist pcspkr
Auto-rip:sudo apt-get install incronsudo apt-get install inotify-toolssudo pico incron.allow
--> add: root
username (replace username with actual user name)
incrontab -e
--> add: /dev/cdrom IN_ATTRIB /home/username/autorip.sh $@/$#
DVD backup:sudo apt-get install dvdbackupsudo pico -w /etc/apt/sources.list
--> add: deb ftp://ftp.videolan.org/pub/debian/stable ./wget ftp://ftp.videolan.org/pub/debian/videolan-apt.ascsudo apt-key add videolan-apt.ascsudo apt-get updatesudo apt-get install libdvdcss2
and finally, the script that makes it all happen:
3.9.3. Auto-ripper script
Features:
- Zero-click ripping - automatic detection of disk insertion
- Automatic recognition of disk type (CD, DVD, BluRay, Data)
- Audible beep indicating start and stop of process
- Automatic creation of output folder according to disk label
- Folder name check - if exists, renamed _001, _002, etc.
- Log file containing process status
Download zipped file: autorip.sh.zip
Comments
RSS feed for comments to this post